HTML Table
Well, when we say table, we just see the dinner table, With a lot of delicious dishes. No… we are not talking about that table. I mean to say that we just see some rows and some columns right? In HTML, we are going to make some tables, and eventually, we are doing the same thing(the rows and the columns). Again, to create a table, we need to use some tags.
The tags that we are going to see are table(which will contain the whole table), tr(which defines the row), td (which defines the data cell), etc.
Adding table headers, rows, and filling data to the data cells
So, our table will be written within the table tag(between the <table> and </table>).
Here are some tags that we are going to use while creating the table –
- table
This contains the whole table. - tr
it represents a row. - td
It represents a data cell. (the content between the <td> and </td> is content of that data cell) - th
This represents the header cell for the table.
The table consists of rows and columns, and the first row in the table usually contains the headings for the columns right? So for the headings, we have some other tag, which is the th tag.
So, here is how you can create the first row(heading row). We are going to create a row, and it is going to contain some heading. The code also demonstrates the use of tr tag and th tag. Well, we are just using the th tag for giving the heading to the columns. Let’s see how do we do it →
<!DOCTYPE html>
<html lang=”en”>
<head>
<meta charset=”UTF-8″>
<meta http-equiv=”X-UA-Compatible” content=”IE=edge”>
<meta name=”viewport” content=”width=device-width, initial-scale=1.0″>
<title>Some heading here…</title>
</head>
<body>
<table>
<tr>
<th>Heading 1</th>
<th>Heading 2</th>
<th>Heading 3</th>
<th>Heading 4</th>
</tr>
</table>
</body>
</html>
As you can see, the first row contains some headings. If we open the file in the browser, the output is something like this –
 But wait… this is not looking like a table anyways, but let’s add some more rows, and then we will also try to add some borders to the table(well, it is a CSS thing, but we will do it here for better visualization)
So, Now, let’s add another row that defines the data now. You are going to fill the data in a row, from one column to another column. In simpler words, we are going to fill the row from one data cell to another data cell. Let’s see how do we do it →
<!DOCTYPE html>
<html lang=”en”>
<head>
<meta charset=”UTF-8″>
<meta http-equiv=”X-UA-Compatible” content=”IE=edge”>
<meta name=”viewport” content=”width=device-width, initial-scale=1.0″>
<title>Some heading here…</title>
</head>
<body>
<table>
<tr>
<th>Srno</th>
<th>Player Name</th>
<th>Matches</th>
<th>Wickets</th>
</tr>
<tr>
<td>1</td>
<td>Mr.Phirki</td>
<td>10</td>
<td>25</td>
</tr>
</table>
</body>
</html>
If we try to open the file in the browser, the output is something like this –
 So, this is one row with some data cells right? We can write more such rows. Have a look at this –
<!DOCTYPE html>
<html lang=”en”>
<head>
<meta charset=”UTF-8″>
<meta http-equiv=”X-UA-Compatible” content=”IE=edge”>
<meta name=”viewport” content=”width=device-width, initial-scale=1.0″>
<title>Some heading here…</title>
</head>
<body>
<table>
<tr>
<th>Srno</th>
<th>Player Name</th>
<th>Matches</th>
<th>Wickets</th>
</tr>
<tr>
<td>1</td>
<td>Mr.Phirki</td>
<td>10</td>
<td>25</td>
</tr>
<tr>
<td>2</td>
<td>Mr.Yorker</td>
<td>8</td>
<td>27</td>
</tr>
<tr>
<td>3</td>
<td>Mr.Knuckle</td>
<td>10</td>
<td>20</td>
</tr>
</table>
</body>
</html>
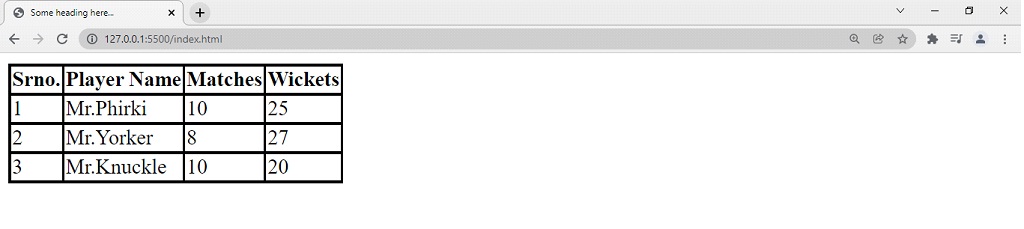
If we try to open the file in the browser, the output is something like this –

So, this is our table. But it does not look pretty right? Maybe because it does not have borders right now, it is not much clear. Let’s add some borders to our table. Remember that this is a part of CSS, but still, to understand the tables in a better way, we are doing this. Don’t worry if you don’t understand how we add borders, you will get it in CSS(Cascading Style Sheets). All you have to do is write the below code in the style tag,(as shown below) and your style tag comes inside your head tag. That’s how it is.
<head>
<style>
table, th, td{
border: 2px solid black;
border-collapse: collapse;
}
</style>
<meta charset=”UTF-8″>
<meta http-equiv=”X-UA-Compatible” content=”IE=edge”>
<meta name=”viewport” content=”width=device-width, initial-scale=1.0″>
<title>Some heading here…</title>
</head>
Note that the CSS here is written into the style element. The other things are as it is, just you have to make these modifications only. After you do this, your table would look something like this →
 So, now the table is looking much better, and clear. Another thing you can do is to add a caption to the table. In order to do this, again you have to use some tag, which is the caption tag. So, immediately after the table tag starts, we can add the caption tag, due to which, some information(about the table of course) will be visible above the table.(below is the full code by the way)
Here is how you do that →
<!DOCTYPE html>
<html lang=”en”>
<head>
<style>
table, th, td{
border: 2px solid black;
border-collapse: collapse;
}
</style>
<meta charset=”UTF-8″>
<meta http-equiv=”X-UA-Compatible” content=”IE=edge”>
<meta name=”viewport” content=”width=device-width, initial-scale=1.0″>
<title>Some heading…</title>
</head>
<body>
<table>
<caption>Best Bowler of the tournament</caption>
<tr>
<th>Srno</th>
<th>Player Name</th>
<th>Matches</th>
<th>Wickets</th>
</tr>
<tr>
<td>1</td>
<td>Mr.Phirki</td>
<td>10</td>
<td>25</td>
</tr>
<tr>
<td>2</td>
<td>Mr.Yorker</td>
<td>8</td>
<td>27</td>
</tr>
<tr>
<td>3</td>
<td>Mr.Knuckle</td>
<td>10</td>
<td>20</td>
</tr>
</table>
</body>
</html>
Now, if we try to open the file in the browser, the output is something like this –
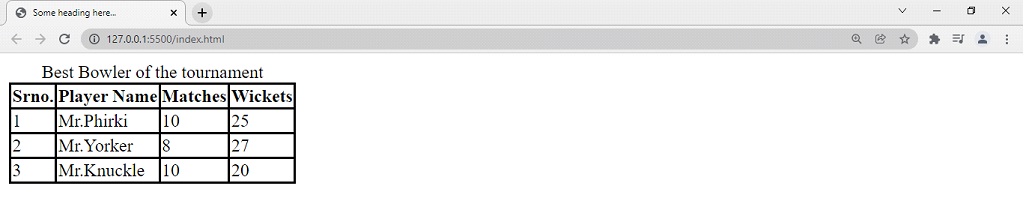
As you can see, now we have a caption available for the table.
HTML Table Rowspan and Colspan
Let’s now discuss something very interesting, which is spanning columns and rows.
At times, we may require some columns to take space of more than one column(for example, people can have more than 1 contact number and they are supposed to come under the same contact number column. You would never want to create a separate column for that every time)
So, you would want to use some attribute for that to clarify that “Hey … I am a column, and I want a space of 2 columns”, or something like that. We are going to achieve this using the attribute Colspan. The colspan is given some value, which is the number of columns it is spanning. Have a look at the example below, to understand the idea behind Colspan.
<!DOCTYPE html>
<html lang=”en”>
<head>
<style>
table, th, td{
border: 2px solid black;
border-collapse: collapse;
}
</style>
<meta charset=”UTF-8″>
<meta http-equiv=”X-UA-Compatible” content=”IE=edge”>
<meta name=”viewport” content=”width=device-width, initial-scale=1.0″>
<title>Some heading here…</title>
</head>
<body>
<table>
<tr>
<th>Srno</th>
<th>Customer Name</th>
<th colspan=”2″>Phone Number</th>
</tr>
<tr>
<td>1</td>
<td>Mr.John</td>
<td>0000000000</td>
<td>0000000000</td>
</tr>
<tr>
<td>2</td>
<td>Mr.Bob</td>
<td>0000000000</td>
<td>0000000000</td>
</tr>
<tr>
<td>3</td>
<td>Ms.Alice</td>
<td>0000000000</td>
<td>0000000000</td>
</tr>
</table>
</body>
</html>
If we try to open the file into the browser, the output is something like this –

This way, you can span more than one column as per your requirement. Now, similar to this, it might be sometimes required to span a row, in more than one row. If we wish to do this, we have the rowspan attribute, through which, we are going to specify that this particular row needs to span more than one row. This attribute can be applied with the td and th tags. In the below example, we have two such occurrences, where we need to span more than one row. With the example, you will also get to know some use cases for spanning the rows, and you can use them whenever you require.
Have a look at the below example now –
<!DOCTYPE html>
<html lang=”en”>
<head>
<style>
table, th, td{
border: 2px solid black;
border-collapse: collapse;
}
</style>
<meta charset=”UTF-8″>
<meta http-equiv=”X-UA-Compatible” content=”IE=edge”>
<meta name=”viewport” content=”width=device-width, initial-scale=1.0″>
<title>Some heading…</title>
</head>
<body>
<table>
<tr>
<th>Food type</th>
<th>Dish</th>
<th>price(per plate)</th>
</tr>
<tr>
<td rowspan=”2″>Chinese</td>
<td>Manchurian</td>
<td>50</td>
</tr>
<tr>
<td>Hakka Noodles</td>
<td>90</td>
</tr>
<tr>
<td rowspan=”2″>South Indian</td>
<td>Masala Dosa</td>
<td>45</td>
</tr>
<tr>
<td>Idli Sambar</td>
<td>40</td>
</tr>
</table>
</body>
</html>
Now, if we try to open the file in the browser, the output is something like this –
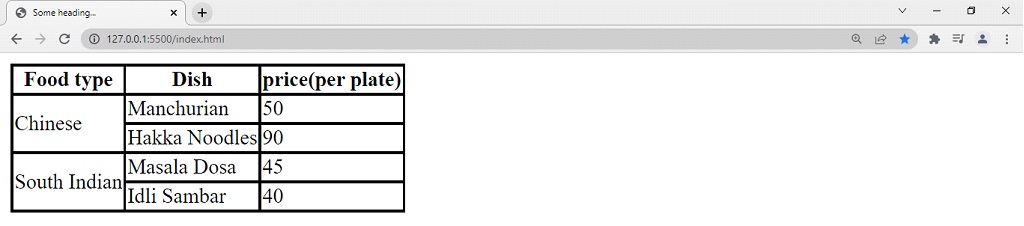
As you can see, in the food type, we were required to span more than one row. You can also try doing this, and play with it, so as to understand the idea.
We can further style the table, but it is part of CSS, so we are not going to see this here.