HTML form
Well, you might have seen forms on many websites. There are some fields where the user can input something. You might have filled out many forms in which you may have filled the email id, name, date of birth, etc. What if you come to know that you can also create forms using HTML?
Well, you can! And that’s too easy. So, again, here we are going to use some elements for creating a form in HTML. Our form can have a text input, email, date, checkboxes, radio buttons, etc. So, at first, we are going to use the form element, which will contain your whole form. Within that form element, we are going to have some inputs and some corresponding labels. Inputs are the fields where the user can give inputs, and labels are used as a tag for that particular input box.
Well, the question is that how are we going to create the input box? It’s very simple by the way, and to achieve this, we are going to use another tag, which is the input tag. Remember that right now we are just creating an input box, which is just a part of our form.
Let’s create an input box with help of the input element. It has some attributes which provide some additional information about the input box. It includes the type of input box, which tells whether the input is supposed to be some text, email, password, date, checkbox, radio button, etc. Other attributes are id and name, which we will be using. The name attribute here is used to specify the name of the form element, and the id is the unique identification of an element. Remember that you should have only one element with one id.
Creating a basic input box
Have a look at the below example, where we are creating a basic input box, in which, we are going to input some text.
<!DOCTYPE html>
<html lang=”en”>
<head>
<meta charset=”UTF-8″>
<meta http-equiv=”X-UA-Compatible” content=”IE=edge”>
<meta name=”viewport” content=”width=device-width, initial-scale=1.0″>
<title>Some heading here…</title>
</head>
<body>
<input type=”text” name=”textbox” id=”sometext”>
</body>
</html>

Well, if you now try to open the file in the browser, the output is something like this –
So, as you can see that we created an input box, and that too very easily. But wait… How will someone understand what to fill in this input field? Is that field for an email, password, or name?
Well, we need some label for this input field, so that it can be understood, for what thing this input field is given. Here’s where the label tag comes into the picture. Let’s understand the label tag now. Well, a label tag means we are giving some label to the input box. It is like a caption for the input in the interface.
Remember that this label is supposed to be associated with that input box. So the id of the input box and the attribute of the label tag should match.
Creating a label for the input box
Adding a label to the input box
Now, let’s try adding a label to our input box, in which, let’s say we are going to accept the name of the user, So, the type of the input is going to be text, and we are also going to give some id –
<!DOCTYPE html>
<html lang=”en”>
<head>
<meta charset=”UTF-8″>
<meta http-equiv=”X-UA-Compatible” content=”IE=edge”>
<meta name=”viewport” content=”width=device-width, initial-scale=1.0″>
<title>Some heading here…</title>
</head>
<body>
<label for=”sometext”>Please enter your username </label>
<input type=”text” name=”textbox” id=”sometext”>
</body>
</html>
Now, if we try to open the file in the browser, the output is something like this –

Notice that, if we are focusing on the input box, we can type into it. But even if we are clicking on the label, the input box gets focused. But how was this possible? Well, we could achieve this, since the attribute of the label contains the same value as the id of the input box. This is like, this label is for this input box. So, the attribute of the label, and the id attribute of the input box, are supposed to have the same values. Now, we know that the id is unique, which means that two input boxes are not supposed to have the same ids.
Now, if you are wondering why is it even important to have the label and input box associated? Cannot we just click on the input box when we wish to write something? Well, it is right, but what if the input is a check box or radio button? We will have to only click that input thing to check or uncheck it or mark it if they are not associated with the label. But if the label that we have, is associated with the checkbox or radio button, just by clicking the label, we can toggle the checkbox, or mark the radio button.
Also notice the form tag, which contains all the input elements. If you are using the same IDE as me, you might have got some attributes within the form start tag, with the name action. With this attribute, we are specifying where should the data be sent for processing, after the form is submitted. But, we are just creating a simple HTML form, and for now, we are not going to get into the data processing thing, but this was just for your information if you are wondering what it is.
So, now we have some input fields and a label associated with them.
This field is for some text, as stated above in the code. You can create some input for email, or some text (like first name, last name, hobbies, or whatever but just the text), or for the password, or date, or for choices, we can have radio buttons or checkboxes and much more.
Some different input fields for the form
Well, first we need to understand that all we are doing is just creating the input fields, so we are using the input tag only, just changing the type of input(radio, checkbox, date, etc) so we are not doing anything out of the box. Let’s now have a look at some different input fields for our form in HTML –
Input field for password
Sometimes, you might have put the password into some input box. It appears as a hidden text, and we are able to see only some dots or bullets instead of characters. Let’s see how we can create a field for passwords.
<!DOCTYPE html>
<html lang=”en”>
<head>
<meta charset=”UTF-8″>
<meta http-equiv=”X-UA-Compatible” content=”IE=edge”>
<meta name=”viewport” content=”width=device-width, initial-scale=1.0″>
<title>Some heading…</title>
</head>
<body>
<form>
<label for=”username”>Enter username </label>
<input type=”text” name=”username” id=”username”>
<br>
<br>
<label for=”password”>Enter Password </label>
<input type=”password” name=”password” id=”password”>
</form>
</body>
</html>
Now, we have two input fields and their associated labels. Notice that, for the field that is supposed to have a password, we have the type password for the input box.
Input field for calendar
Many times, we might need to put a calendar into the form, due for any reasons, like if we are accepting the date of birth, date of journey, etc. So, if you want to have some data as user input, then you can do something like this. Have a look at the below example, through which, we can understand the data type input –
<!DOCTYPE html>
<html lang=”en”>
<head>
<meta charset=”UTF-8″>
<meta http-equiv=”X-UA-Compatible” content=”IE=edge”>
<meta name=”viewport” content=”width=device-width, initial-scale=1.0″>
<title>Some heading here…</title>
</head>
<body>
<form>
<label for=”calendar”>Select date</label>
<input type=”date” name=”date” id=”calendar”>
</form>
</body>
</html>
If we try to open the file in the browser, the output is something like this –

You can choose some dates from the calendar given here.
Input fields for radio buttons
Now, there are some situations, in which, you might want to have radio buttons in our form. In situations, when you want only one thing out of several things to be selected, at such times, you would want to have the radio buttons.
Like, you might be familiar with the multiple-choice questions, or MCQs, where we have multiple choices, and we can select one. Or in case, we are given the option to choose gender, or in any situation, where we are required to select something out of many different things, we would make use of the radio buttons. Simply, we are just going to create some input elements, and the type would be radio this time. Have a look at the below example, to understand how can we create radio buttons –
<!DOCTYPE html>
<html lang=”en”>
<head>
<meta charset=”UTF-8″>
<meta http-equiv=”X-UA-Compatible” content=”IE=edge”>
<meta name=”viewport” content=”width=device-width, initial-scale=1.0″>
<title>Some heading…</title>
</head>
<body>
<div>this is some question… 2 + 2 = ?</div>
<form>
<input type=”radio” name=”value” id=”Option1″ value=”22″>
<label for=”Option1″>22</label>
<br>
<br>
<input type=”radio” name=”value” id=”Option2″ value=”4″>
<label for=”Option2″>4</label>
<br>
<br>
<input type=”radio” name=”value” id=”Option3″ value=”5″>
<label for=”Option3″>5</label>
<br>
<br>
<input type=”radio” name=”value” id=”Option4″ value=”I don’t know”>
<label for=”Option4″>I don’t know</label>
</form>
</body>
</html>
This time, have a look that we have specified the type of the input field as radio, and we are supposed to have some radio buttons. Also notice that the ids are different, and the inputs have some labels associated with them. If you try to open the file in the browser, the output is something like this –
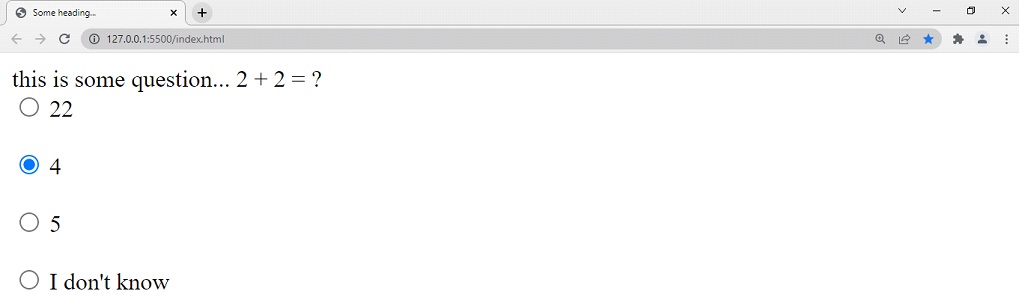
Now, we can see that we got some options for the question. I have selected the second option by myself. The fact is that we can check only one option, out of the given 4 options, since the name for all the inputs is the same. Try to change the names for the values, and observe what you find here.
You will observe that as long as the radio buttons are sharing the same name, they are in a group(referred to as a radio group). In a group, when we select another radio button, the previously selected radio button gets deselected automatically. The value attribute is holding the value for that particular radio button. It is not visible to the user. It is used to identify which radio button is selected from the radio group.
So, whenever you are in such situations, where you need to select one thing out of a set, you can make use of the radio buttons here.
Input field for checkboxes
Now, let’s have a look at the checkboxes. You might be familiar already with what checkboxes are, just like you are familiar with the radio buttons. The checkboxes are used whenever we want something to be checked or unchecked. Let’s say you have a website, which helps people order things like electronic devices, daily essentials, and many more things.
Now, at the time of checkout, you have kept an option there, in the form of a checkbox, asking the user that do they want this item to be gift-wrapped. If the user checks the checkbox, you can consider that ok… the user wants the item to be gift-wrapped.
Another example that you might have come across, is maybe the terms and conditions and privacy policy things. Let’s say you are filling out some form, for maybe a job application, on my website. After you have filled in all the details, and are about to submit the form, just before the submit button, there may be a little checkbox, with a label that “I agree to all the terms and conditions”, or something like that, and if you check the checkbox, then only the submit button is going to be enabled to be clicked on. Else, the submit button is going to be disabled.
This means that you are agreeing to our terms and conditions if you check the checkbox, and then the button will be enabled.
So, in some situations like this, we can make use of the checkboxes. Let’s have an example, where we are going to use the checkboxes.
Here is the code for creating the checkboxes →
<!DOCTYPE html>
<html lang=”en”>
<head>
<meta charset=”UTF-8″>
<meta http-equiv=”X-UA-Compatible” content=”IE=edge”>
<meta name=”viewport” content=”width=device-width, initial-scale=1.0″>
<title>Some heading…</title>
</head>
<body>
<form>
<label for=”emailaddress”>Enter your email address </label>
<input type=”text” name=”email” id=”emailaddress”>
<br>
<br>
<label for=”password”>Enter your password </label>
<input type=”password” name=”password” id=”password”>
<br>
<br>
<input type=”checkbox” name=”check” id=”samplecheckbox”>
<label for=”samplecheckbox”>I agree to all the <a href=”#”>terms and conditions</a> </label>
<br>
<br>
<input type=”submit” value=”Submit”>
</form>
</body>
</html>
If you try opening the file in the browser, the output is something like this –
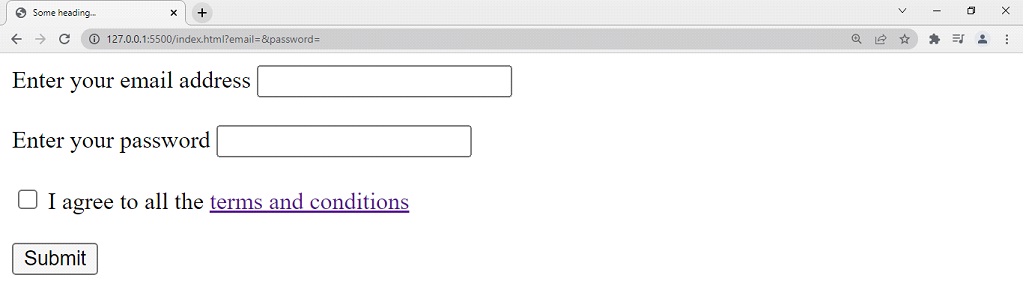
As you can see, the checkbox is present there, with some label associated with it. You might have come across such a checkbox at some point. Well, right now, the checkbox is unchecked, but you can toggle it to check or uncheck.
Also, we can just disable the submit button, and only enable it for clicking, when the checkbox is checked. However, this is not the part of right now, but we are just able to create a small, simple, good-looking form. Also, you can have a look at the button, which we have here. While we are going to submit the form, we are going to need the button thing.
Also, there is a boolean attribute called checked, which indicates whether or not the checkbox is checked by default. Have a look at the below example, where we are trying to put the checked attribute into the input checkbox.
<!DOCTYPE html>
<html lang=”en”>
<head>
<meta charset=”UTF-8″>
<meta http-equiv=”X-UA-Compatible” content=”IE=edge”>
<meta name=”viewport” content=”width=device-width, initial-scale=1.0″>
<title>Some heading…</title>
</head>
<body>
<form>
<label for=”emailaddress”>Enter your email address </label>
<input type=”text” name=”email” id=”emailaddress”>
<br>
<br>
<label for=”password”>Enter your password </label>
<input type=”password” name=”password” id=”password”>
<br>
<br>
<input type=”checkbox” name=”check” id=”samplecheckbox” checked>
<label for=”samplecheckbox”>I agree to all the <a href=”#”>terms and conditions</a> </label>
<br>
<br>
<input type=”submit” value=”Submit”>
</form>
</body>
</html>
So, now, if you try to open the file in the browser, with the effective changes, the output is something like this –
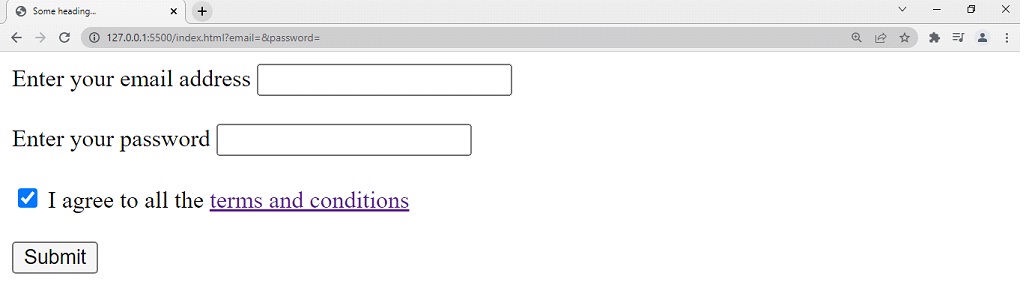
So, we have seen many form elements, but when you have written the form, you need some button to submit the form right? You can use the button tag or the input tag with the type button. We have used the input tag in the above example, to create a button for type submit. The value attribute for the button is whatever is visible in the button.
Creating a basic form with help of some discussed fields
Well, if all the code is brought together inside the form tag, the complete form looks something like this-
<!DOCTYPE html>
<html lang=”en”>
<head>
<meta charset=”UTF-8″>
<meta http-equiv=”X-UA-Compatible” content=”IE=edge”>
<meta name=”viewport” content=”width=device-width, initial-scale=1.0″>
<title>Some heading…</title>
</head>
<body>
<form>
<label for=”username”>Enter your username </label>
<input type=”text” name=”username” id=”username”>
<br>
<br>
<label for=”emailaddress”>Enter your email address </label>
<input type=”text” name=”email” id=”emailaddress”>
<br>
<br>
<label for=”password”>Enter your password </label>
<input type=”password” name=”password” id=”password”>
<br>
<br>
<label for=”passwordagain”>Enter your password </label>
<input type=”password” name=”passwordagain” id=”passwordagain”>
<br>
<br>
<label for=”dob”>Enter your date of birth</label>
<input type=”date” name=”dob” id=”dob”>
<br>
<br>
<input type=”checkbox” name=”check” id=”samplecheckbox”>
<label for=”samplecheckbox”>I agree to all the <a href=”#”>terms and conditions</a> </label>
<br>
<br>
<input type=”submit” value=”Submit”>
</form>
</body>
</html>
If we try to open the file in the browser, the output is something like this –
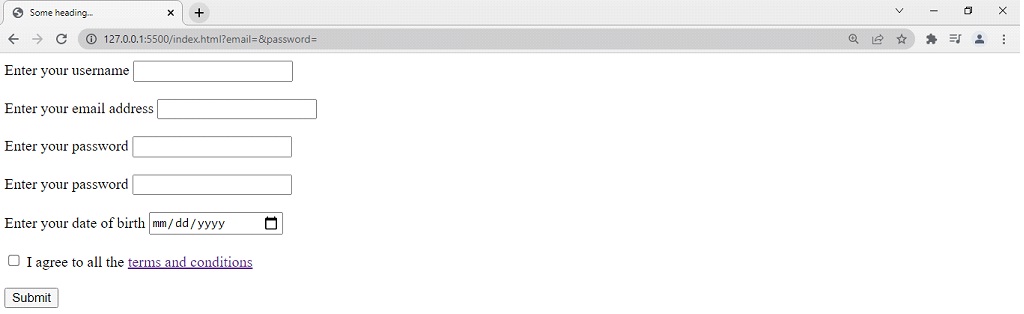
So, I hope now you might have understood the concept of forms, and it is very very simple. So now with this, let’s move ahead.