JavaScript Objects
In JavaScript, the object is a collection of properties, and the property is a key, value pair. This means that we are going to have some key and some value associated with it. Also, we can have functions as values. But in this case, these are called methods, since they are limited to that object. We can say that whatever property we are going to have here, is going to be for that Objects in Javascript.
Objects in Javascript
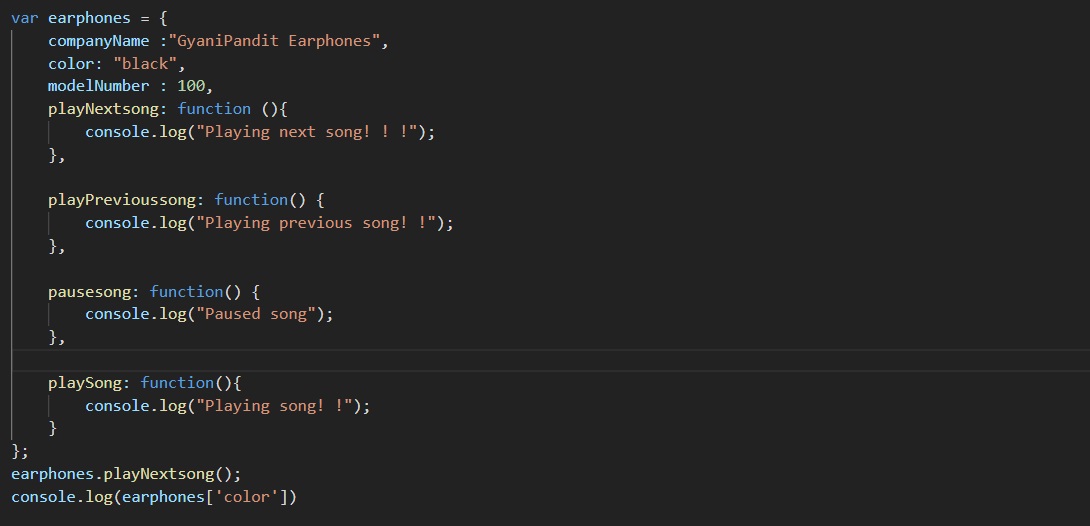
We can compare the object in JavaScript with some objects in real life. Let’s consider some earphones. Well, earphones are some real-life objects, and they also have some properties, like company, color, weight, model number, etc. Also, it has some methods as well, like playing the next song, or the previous song, pausing/playing a song, increasing decreased the volume, etc.
Creating Objects in Javascript
So, when we have understood what is an object basically, let’s move on to create some objects. When we would try it out ourselves, it would become easy for us, and we would become familiar with the concept.
Have a look at the below program, where we are just getting familiar with how can we create objects in JavaScript. Basically, we are trying to look for the foundation now. To create objects, you can just create simple variables as we do regularly and just add some curly brackets over there. That’s it. You have made your first object! But, we would need some properties and methods for the object, and we are going to do that soon.
Firstly, have a look at the below code, where we are understanding how to create objects.

So, if you have a look at the output of the above program, you can just see that the output comes out to be an object. We are just checking the type of what is there with the variable.
Later on, you can find that there are some more ways as well, to create the object. But, for now, let’s go ahead with this one way, and later on, we are going to explore the other ways as well.
Adding properties to the Objects in Javascript
Now, we are quite familiar with how can we create an object. But the thing is that we saw earlier, that the object is a collection of properties and values, but here in the object that we have created above, we cannot even see the properties as well as values. So, we have an object now, and we need to have the properties there. Have a look at the below example, where we are trying to have the properties, and we are also accessing the properties.
Remember that the object properties are the key:value pairs. This simply means that we are going to have the key and its associated value. As we move ahead and have a look at different properties, we would gradually become familiar with the concept.

In the last two lines, we are accessing the properties and methods of the object, and the rest of the lines are of the object.
Remember that all the object properties and methods are there within the curly brackets.
Let’s now have a look at the output, and we can see that we are able to access the properties. →

In the last lines, what we are doing is accessing the properties of the object. Well, there is another way as well, to access the values of those properties, where we make use of square brackets. Let’s have a look at another way of accessing the values.
As you can see in the last instruction in the above code, we are just making use of the square brackets after the name of the object, and inside the quotes, we are specifying the name, of which, we want the value. If we try to have a look at the output, it comes out to be something like this –
As you can see, we asked for the color value, and we got the color value as black. This is pretty amazing. So, with this, we understand, that we got multiple ways to access the values of the object properties. But now, there might be a question, regarding which one to use, the dot operator thing, or the square bracket thing. Which one is better? Well, the answer is both… you can use them depending on your requirement. Using the dot operator seems to be much more convenient for me, and you would also want to use it often, but sometimes, it becomes necessary for us to make use of the square brackets. Let’s discuss one such case, where we would want to use the square brackets.
Well, in the below example, you would get that sometimes, we would want to make use of square brackets here. Let’s consider that the name of the property comes as user input. In this case, you do not know what property is it going to be. So, in this case, you would not make use of the dot operator, but instead, make use of square brackets. Here is an example now –

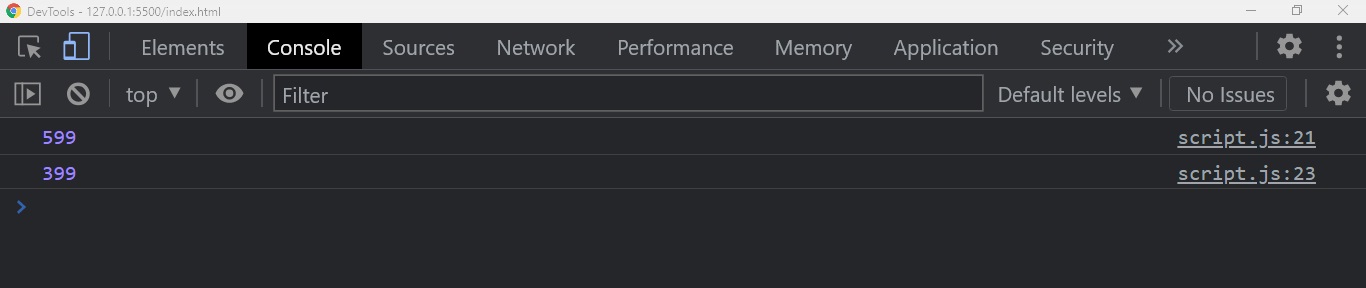
As you can see, we have a variable named property, which holds a string price (this was supposed to be a user input, but let’s imagine this as user input). Now, we have to get the value of the specified property.
In the last lines, Below, we are using both the dot operator and the square brackets. But when we make use of the dot operator, this is going to give the output as undefined, because no such property, named as property, is there for the specified object. But, when we are making use of square brackets, we get the value for the specified property. Have a look at the output –

As you can see, in the case when we do not know what property value are we going to fetch, we can make use of the square brackets.
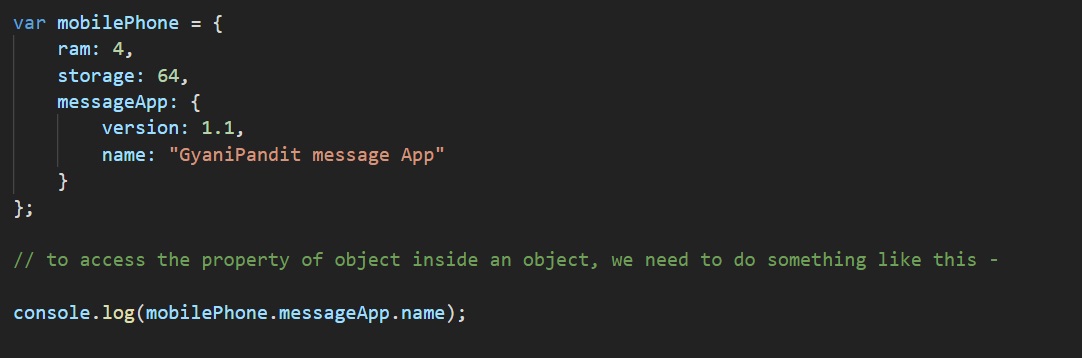
Creating objects inside an Objects in Javascript
As the heading of the section says, we are going to create objects inside objects. So, we are going to get into more complex stuff. We can create objects inside objects, and we can do it very easily.
In this case, the name of the object is going to be the key, and then we are going to just write the objects as we do usually. Have a look at the below example, to understand how to create complex objects.

As you can see, we could create an object, inside an object. To access the values of the property values of the inner object, we are making use of the dot operator.
Deleting some properties of the Objects in Javascript
Now, if we want to delete some property for the object, it is also very easy. We just need to use the delete operator. Here is how we do that. Let’s say that we want to delete the property model number from the previous example of the earphone object. Let’s do that now –
As you can see, we have specified to delete the property model number, from the earphones object. Also, we are getting the object on the console before deleting the object, and after deleting the object.
Now, it’s time to have a look at the output for the above program. You can simply observe in the output, that the model number property is no more available.

As you can see, the model number, which was earlier in the output, is not thereafter deleted. So, if you want to delete some property, you can make use of the delete operator.
Some other ways to create Objects in Javascript
Now, we are going to head up, to have a look at some of the ways through which, we can create the objects. Here, we have already seen a way, which is using curly brackets. But here, we are going to make use of the new keyword, and also, there is another method, called the create method, which will be used to create an object.
Way 1 – Use the new keyword.
First, we are going to have a look at how can we create an object using the new keyword.
Now, we are going to head up and look for another way to create an object, which is using the new keyword. Let’s have an example, so we can understand the whole thing. Basically, we would be creating the new object, with the help of the new keyword, this is the idea.
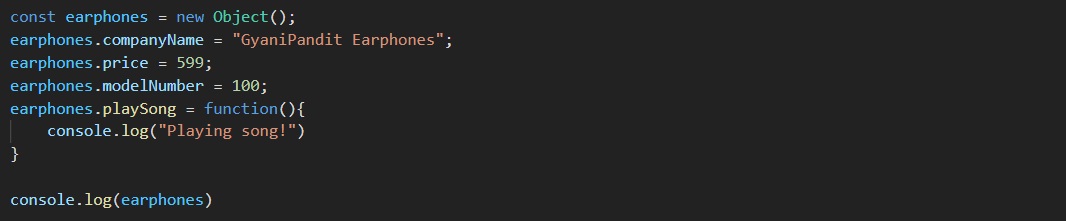
As you can see, we could create an earphone object here, with some properties, like company name, price, and model number, and also, we have got a function here, which is playSong. So, this was just another way to create objects.
Way 2 – using the create method
There is yet another way to create an object, which is using the create method from the Object class. This way can be used when we want to create new objects from other existing objects. So, let’s say that we have already created one object, and now we want to create another object, with help of an existing object. So, we can do it pretty easily. Here is how we do that –
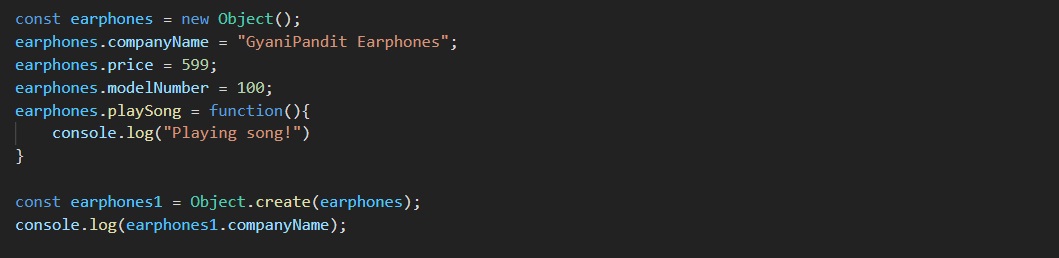
In this thing, what we are doing is just creating a new object with help of an existing object. This is pretty simple. The thing is that the properties that the already existing object has, would be taken here as the prototype for the new object. So, the properties from the existing object, like company name, price, etc are already there.
If we try to have a look at the output, the output is something like this –

As you can see, we got the company name here, and the properties of the existing object are here in the prototype of the newly created Objects in Javascript.
So, we can use the create method, to create an object, with the help of an existing object. We can make use of this method as and when required. You can also try the method so that you get familiar with it.
Freezing the Objects in Javascript
Well, sometimes, it may happen that you are required to make your object such that no one can add any additional properties to it, remove any properties from the object, or even make any changes to the already existing properties. In such a case, we can use the freeze method, through which, we can freeze the object, so as to apply the above-stated things to the object so that no one can play with it. Let’s have a look at the program now –

In the above example, the freeze method is not yet used, so we can make some changes to the object, like we can make changes to the property values, add new properties, remove existing properties, etc. But, once the object is frozen, we cannot make these changes. Have a look at the output, so that we can make sure that the changes were happening before we used the freeze method –
As you can see, changes have happened here. But now, let’s have the freeze method in action. After we use the freeze method, we will try again, to play with the properties, and we will find that we cannot make any kind of changes to the object.
In the below program, you can see that we have used the freeze method. Have a look at how we use it. We are just doing Object.freeze(), and inside the brackets, we are passing the object that we want to freeze. It returns the same object.

Now, we have frozen the object, which simply means that we are not allowing any new changes to the object, like adding some new property, removing some existing property, or even altering the values of the currently existing properties. You can try checking out the output of the above program. As you give it a try, you can get a better understanding and practice the freeze method.
Sealing the Objects in Javascript
Sometimes, we might need to put some restrictions on our object, in a way, that we cannot add new properties to the object, or remove the existing property from the object, but, we allow to alter the values for the existing properties. For that, we are going to seal the object.
Another method that we are going to discuss is Object.seal(). Well, with this method, we are sealing the object, which means that we are preventing adding new properties and deleting the existing properties. However, we can make changes to the already existing properties. Let’s have a look at the example program now, through which, we can understand what the sealing method does –

As you can see, now, we have used the sealing method on the earphones object, which prevents the addition of any properties to the object, and the deletion of any existing properties from the object. However, making changes to the existing properties is still possible. If we try to have a look at the output, we can find that the deletion that we desired is not done, since the object is sealed.
You can try making changes to the existing object, and you will find that we are able to make the changes.
You can play with the concept of objects and play with them more, so as to understand the concept of the Objects in Javascript and become familiar with them.